Wednesday, May 15, 2013

Sims Medieval - Layouts - Tavern

This is a sample starting Tavern (using the Furnished option) that grants the +25/- Nicely Decorated buff.

A music box is on the end table moved from the upstairs room down to the main floor, upper right corner. A lot of performances depend on Focus, so the Decoration buff is important to raise.

Tavern 1 Nicely Decorated 25 buff

Sims Medieval - Layouts - Wizard's Tower

This is a sample starting Wizard's Tower ground floor (using the Furnished option) that grants the +25/- Nicely Decorated buff and centralizes many services in the entrance.
Meditation is unlikely to succeed here as the order causes the sim to move to a clearing to begin. Because of the tight space and clutter, the sim might not be able to find that open space to begin Meditation.
As usual we have included a music box, this one at one end of the stone dining table.

The fireplace can be changed to an oven later as long-lasting food is useful for a Wizard. A Wizard can Meditate in lieu of sleeping and can do so just about anywhere, so being able to store food for picnics can extend the "operation range" and duration of a wizard whereas all other professions need to sleep (or use a Crafthole) potion.

Wizard's Tower 1 Nicely Decorated 25 buff

Since the Wizard already has the best Archive and Crafting Table, the Healer next door will not need to upgrade these items and can just wander over. However, since neither activity uses Focus, this is not really necessary.

The only workstation we didn't want to squeeze in was the Forge. A Wizard should have their own forge as you might end up competing with the Blacksmith, and being even briefly unable to access the forge to Heat the item being forged can use it to cool into the blue zone and count as a "mistake".

Sims Medieval - Layouts - Market

This is a sample starting Market (using the Unfurnished option) that grants the +25/- Nicely Decorated buff.

Proximity to Environment items appears to be a factor in determining what kind of buff is granted. In this particular starting layout, we have placed the market as close as possible to the path to the Village. A Merchant standing next to the Blue Tent (where they always stand, and it is the tent they move to when a sale is made) can get a +25/- Nicely Decorated buff.
If they walk a little outside this area past the Blue tent, that buff disappears because it is now too far from enough Environment influencers.

We have a music box on the dining table nearest to the Blue Tent. AI Sims like to keep that device playing, and when it is not, they frequently all race for it and you will see some frustrated sims because the device is "not accessible" (i.e., some other sim is already in line to use it).

Market 2 Well Decorated 25 buff

Market 1 placement


Since the Merchant can make both money and levels quite quickly, it is not necessary to upgrade the Decoration buff to the +40/- level quickly, but we should do so early in a Kingdom for the same reason we aimed for Beautifully Decorated in the Throne Room: It benefits other heroes. The central location of the Markets; the availability of space; and the easy access to cash as the Merchant means we can put various profession-related structures (such as a stage for Bard performances) in the same area to benefit from the Decoration buff. A sample layout is below.

Market 3 Beautifully Decorated 40 buff

Not all furnishings are vital here for the Nicely Decorated buff almost everywhere in the market square, although at least two items of Environment 7+ are a necessary condition. We have also tucked in a desk for the Bard behind the red tent, and a mirror left over from the earlier layout.

Sims Medieval - Layouts - Throne Room

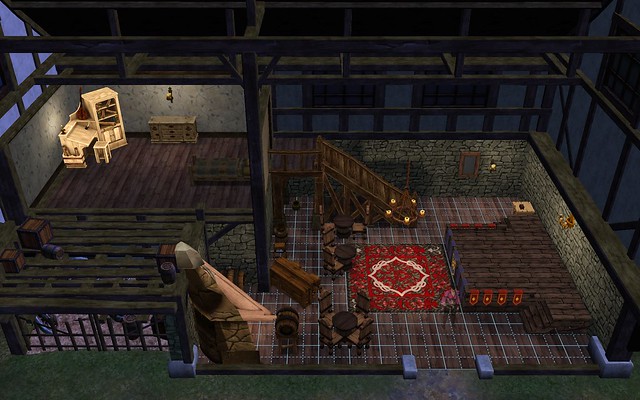
This is a sample starting Throne Room (using the Unfurnished §12,500 option) that grants the +40/- Beautifully Decorated buff in the main room. The upper floors are completely empty. The side rooms are very spartan, as shown. Basically, it encourages all AI sims to stay in the throne room for convenience if nothing else.

Although we could probably have optimized it even further cost-wise, we still wanted an essentially functional and somewhat reasonable starting throne room.

Throne Room 1 Beautifully Decorated 40 buff

The marble table to the left of the throne doubles as serving table and guest table. The servant prepares food in the kitchen to the left, and since there isn't any table in there, he typically brings it out and tries to lay it on the marble table. Alternatively, the Monarch can grab food and drink from the Larder and Keg and sit down immediately.

Once more funds become available, we might expand the kitchen properly and move all dining there if the Throne Room starts to become too busy with sims. For the moment, this is basically the only room in the castle. Guests can help themselves to food and drink, or entertain themselves listening to the NPC Bard that frequently comes here. Also, we choose high-Entertainment furnishings for the dining table and chairs, so that helped us get the Beautifully Decorated buff. Even the Larder adds an Entertainment bonus.

Key to getting the +40/- Beautifully Decorated buff with our starting funds was getting a good Environment score for our simoles spent, which is why we went with wall lights. Floor torches were slightly cheaper but we wanted to save as much floor space as possible.
Getting past +25/- Nicely Decorated required 2-3 items rated at Environment 7+, no matter how many Environment points were already in the room from other objects. Hence, we squeezed in one sculpture and one painting.

The Monarch has just one indoor Responsibility that requires Focus: Writing a Treaty of Ongoing Peace. The only other Responsibility that uses Focus is Hunting a Great Bear, and that is outdoors and obviously would not benefit from the Throne Room's focus bonus.
However, having a high Focus also increases your quest performance. Since you can spend a lot of time in the castle, staying in the Throne Room while having very high Focus can build your quest performance even if you have severely neglected your current quest; at the least, it can mitigate the penalty by slowing it down.
Having a high Focus in the Throne Room also helps other heroes such as the Bard (performing for money) and Spy (pickpocketing).

Notice the music box on the marble dining table. Sims very frequently beeline for it to turn it on, which provides not only a Listening to Music buff but also an Entertained buff. The radius of the Listening to Music buff is quite small, so we have placed it quite close to the centre of activity.

Throne Room 2

This very spare kitchen can be expanded later once we can get more furnishings for the Throne room and move the dining activity here. For convenience, however, we will probably still want a keg in the Throne Room for a quick drink to boost Focus. We could run to the kitchen, but every time you move into an area where the bonus for Decoration changes, the bonus completely disappears for a while. The same applies when you place or remove furnishings and trigger a change in the Decoration bonus calculated by the game.

The Servant in the castle randomly prepares various types of meals -- even with the possibility of whale meat as an ingredient. For this reason, we got the FrostStone Larder right away. Typically you can call for one meal, and when it arrives, call for another immediately. Eat one, stash the rest in the Larder just in case you come back to the castle at an odd hour and the Servant cannot be called.

Throne Room 3

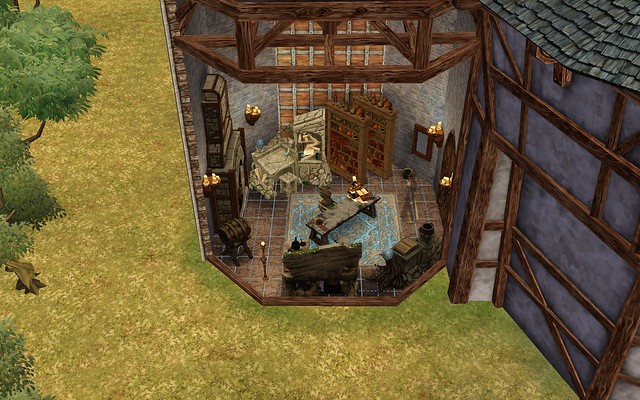
What used to be the strategy room and office has now become the bedroom / ready room. We got a really good bed and left upgrading the bathtub and mirror for later. The mirror could also be moved to the main Throne Room for quickly Gussying Up.

Once the Spy becomes available, we will probably ignore their spy quarters and instead move them to a room upstairs simply to shorten travel time and to take advantage of the castle's kitchen and larder. The Monarch would have to pay for all furnishings, however, and a good bed can be pretty costly.

Wednesday, May 8, 2013

Grail Quest's Dawn of War II Convenience Mod

GQ Dawn of War II (and Chaos Rising) mod
download: version 2013-April-9
Requires the Chaos Rising expansion.

This mod includes various conveniences for gameplay, as well as variants adjusting the difficulty settings for various reasons. Full changelog is below and also in a text file.

[VERSIONS INCLUDED]
.The default version is gqDOW2CR.module and the directory gqDOW2CR\
.The gqDOW2CR_x100Health.module and the directory gqDOW2CR_x100Health\ is a general purpose tester module where all units that are marked "ally" (including your squads) have x100 normal health. Sample uses:
.Test powers and builds
.Compare armor loadouts
.Quickly re-play missions and jumpstart your campaign to an advanced state
.Quickly re-play a mission because your game crashed mid-save
.The gqDOW2CR_Normalized.module and the directory gqDOW2CR_Normalized\ changes difficulty settings so that all difficulties are the same as Normal Difficulty
.The gqDOW2CR_God.module and the directory gqDOW2CR_God\ changes difficulty settings so that enemies have x0.1 normal health and allies have x100 health; all settings are relative to their difficulty level.

[INSTALLATION]
(1) Extract the .module file and the directory of the same name to the DOW2CR directory
(2) Prepare a shortcut with target command line that tells the game to load the mod. E.g., ...\DOW2CR\DOW2.exe -modname "gqDOW2CR_x100Health"

[CHANGES]
>Mid-Mission Saves activated for Space Marines campaign
FILE campaign\space_marines\campaign_description.lua
.enabled (buggy) mid-mission saves by changing this variable from "false" to "true"
can_be_saved = true

>Skill Respec button activated for Space Marines campaign
FILE campaign\space_marines\missions\ss1_sep1.lua, function ss1_sep1.OnComplete()
.line added to enable the skill respec button
Campaign_SetUIVisibility( UIV_InventoryRespecButtonPing, true ) -- GQ - this line is copied from the DOW2CR mission x01_arrival.lua; it activates the skill respec button

>Skill Respec button not deactivated for Chaos Rising campaign
FILE campaign\xp1\missions\x03_librarian.lua, function x03_librarian.OnComplete()
.line disabled to prevent losing the respec button
Campaign_SetUIVisibility( UIV_InventoryRespecButtonPing, false )

>Give some inventory items right away in Space Marines single player campaign
.FILE campaign\space_marines\default_profile\inventory.lua
.List includes all known valid unique items that appear in the Space Marine campaign and Chaos Rising campaign, but most of them are commented out
.Use this to get item pathnames for spawning an item in-game using the console; or edit it to add items you want to start with in the campaign
.Chaos Rising items are apparently usable in Space Marine campaign and some may be equipped due to reduced level requirements
.Probably safe to use, but no guarantee
.The chaos/corruption system is apparently not enabled for the Space Marine campaign
.Wargear Drop Codes: [BbPCSMXx]
[B]oss, Mini-[b]oss, [P]lanet Boss (only 1 item has this code)
[C]haff (pre-placed enemies), [S]warm (enemies spawned during a mission, such as from Waaagh! Banners)
[M]ission Reward
[X] does not drop normally - usually dropped or given in a script, a scripted reward for a particular mission, or possibly not used anywhere or not meant to be used
[x]13dropped (a Chaos Rising situation)
.Most items in the Space Marine campaign are [BCM] (if not indicated) for green, [BM] for blue.
.If all [B] unique items are already in inventory, a boss will drop nothing.
.White items are [CS] in Space Marines campaign and [C] in Chaos Marine campaign (White items are generally not in this list).
.In this file, all items that do not have [b], [C], [S], or [X] drop codes are automatically given in the Space Marine campaign as they are too rare to expect to drop:
.[B] is for mission bosses, and [M] is for mission reward, but both of these instances compete with all other uniques that are typically [BCM]
.Master-Crafted Grenades are automatically given as it is too rare a drop
.Some white items are given to make sure the player has something in that category
.All items that have the word "exclusive" or "coop" in the name are also automatically given in the Space Marine campaign
.Items in the bonus_package_1 directory can drop during the game (unless it has no designated drop code), so they are not automatically given unless they qualify based on the conditions stated above

>Enabled expendable items (such as skill books) from Chaos Rising in the Space Marines campaign
this does nothing unless you also console in some items to use with it
FILE campaign\space_marines\campaign_description.lua
.added this line to allow expendable items from Chaos Rising
expendables_enabled = true

>Slight change to drop rates
FILE simulation\attrib\tuning\tuning_info.rbf
.Drop rates changed: 1f = 100% chance of a model dropping gear
mini_boss from 0.04 to 1
.Probably only has an effect in Chaos Rising since this parameter did not exist in DOW2.

>Expanded XP sharing radius to 100x normal
.XP Sharing Radius changed for campaign:
.line 2746 starts the section for campaign XP information
.line 3462: changed from 50f to 5000f
sharing_radius: 5000f

>Expanded limited use item stacking limits
DIRECTORY gameattrib.sga\simulation\attrib\slot_item\campaign\playable\race_marine\
.Definitions of items are in gameattrib.sga\simulation\attrib\wargear\... RBF files, and the initial count of uses is set there. The maximum stack size is set in gameattrib.sga\simulation\attrib\slot_item\campaign\playable\... RBF files. There is a "can_stack_max" value.
.Unless otherwise indicated, this has been changed from 5 to 50.
sm_cyclone_missile_launcher_barrage.rbf - 4 to 50
sm_cyclone_missile_launcher_for_terminator.rbf - 2 to 50
sm_emp_grenade.rbf
sm_flash_grenade.rbf
sm_frag_grenade.rbf
sm_frag_grenade_veteran.rbf - Master-Crafted Grenades
sm_high_explosive_shells.rbf
sm_high_powered_shot.rbf
sm_medkit_medpack.rbf - Stimpack
sm_melta_bomb.rbf
sm_promethium_bomb.rbf - Immolate (Cyrus flamer ability)
sm_proximity_mines.rbf
sm_remote_detonate.rbf
sm_satchel_charge.rbf - Demolition Charge Pack
sm_suppressive_fire.rbf
xp1\sm_blight_grenade.rbf

Wednesday, May 1, 2013

The Witcher - Epilogue

Click here for a list of all our walkthrough posts for The Witcher (Enhanced Edition).

Because there is already an official Enhanced Edition walkthrough from CD Projekt RED and an extensive database at The Witcher Wiki, we will only be touching on aspects of the game that are not documented there in-depth, or that you may not have thought about doing.

Decision-consequence videos are at the end.

General
  • The Epilogue is pretty linear and boring. There are still a few decisions to be made, and they can affect The Witcher 2 if you import the save game. If you don't plan to, then you can sort of do what you like, and you can see that in the grand scheme of things, your choices didn't really make that big a difference in how the story unfolded.
  • The road to finally meeting Jacques has a bunch of easy fights. It's really more about the dialogues and people you encounter.
Jacques
  • This is the only time you will probably need potions because he wears you down and heals, and because of this, you can't use attrition with spells because your Endurance recovery isn't really fast enough.
  • Use Swallow for insurance, Tawny Owl for Endurance, Quen and Yrden until the Omens are dead. Then Yrden in between you and Jacques until you kill him with Igni.
  • If you want to be less cheap, concentrate on killing the Omens as they come into the circle as they enter one at a time. If you concentrate on Jacques, you'll get swarmed. If you have Quen, you don't have to worry at all and let Yrden kill the Omens, which seem quite vulnerable to Yrden traps. Remember that you can lay a Yrden trap without dropping your Quen shield.
  • It did not seem possible to tear off Jacques's shield with an axe.
King of the Wild Hunt
  • Easier than Jacques because there is room to move. Still too boring to slowly kill him with melee, so use the same Yrden-Igni combo as recommended against Jacques.


The Witcher - Chapter 5 - Old Vizima

Click here for a list of all our walkthrough posts for The Witcher (Enhanced Edition).

Because there is already an official Enhanced Edition walkthrough from CD Projekt RED and an extensive database at The Witcher Wiki, we will only be touching on aspects of the game that are not documented there in-depth, or that you may not have thought about doing.

Decision-consequence videos are at the end.

General
  • Starting with this Chapter, Aard starts to lose effectiveness as bosses have a lot of protection against it so you can't get cheap kills (although you can do it on Mutant Rayla). Yrden is still a boss killer, Igni still does good damage. Effects from oils cannot be relied on to trigger.
  • There are a lot of enemies in Old Vizima initially, but you do not have to clear them all in order to use doors or other area transitions -- only if an enemy is attacking / has selected Geralt as the target. When that happens, you are "in combat" and cannot use area transitions.
  • After going to the Swamp for the first time, the fighting in Old Vizima ends. At that point, nurses (human) and paramedics (elf) wander around helping the wounded.
    • A random paramedic asks for Honeysuckle in exchange for Ifrit bestiary entry.
    • Random Nurse needs Swallow potion, tells about Ifrits.
    • Random Nurse needs Naezan Salts and Wine Stone. Gives nothing.
    • Random Paramedic needs White Raffard's Decoction, tells about Ifrits.
  • In the hospital:
    • Diseased patients might as for aid (1 oren); they do not appear to give anything in return.
    • A patient might ask for food and give you the Garkain bestiary entry.
  • The Swamp spawns a lot of Drowners and Drowned Dead. For the most part, you can simply run away from the monsters, especially if you have the Red Ribbon. You may have to kill monsters if they are too close to an area transition because you cannot use an area transition if a monster has selected you as its target.
  • The Chapter ending transition is under your control for a change. Before you leave for Vizima you can clean up any remaining quests.
[Armor: Part Two]
> [Armor: Gnomish Device], [Armor: St. Gregory's Litany], [Armor: Magic Formula]
  • Regardless of which side you chose (Scoia'tael, Order, or Neutral), the secret locations and components are all accessible, although you will only be able to forge one version of the armour.
  • The  can grant you any of the armour versions, so If you want to follow a particular path but have a different suit or armor, you can get it from the Genie in the Many Items mod.
[Her Highness the Striga]
  • You learn early on that you can make a potion with the Striga's Heart. This mod lets you buy the required ingredient instead.
  • Amazingly easy to keep her alive by just running around the sarcophagus: She gets tied up at the corners negotiating the turns properly. Cast Quen for insurance.
[Sweet Revenge]
  • Koshchey
    • Fast and annoying. Throw up a Quen early. You might still get knocked down but you shouldn't take damage. Aard it to get some breathing room then lay a Yrden trap and lead it into it. You really don't want to go toe-to-toe in melee here unless you like drinking potions.
  • Azar Javed
    • The final encounter with Azar Javed is in two parts. In the first, he escapes and leaves you to fight two minions. After the fight with the minions, you are teleported to the lab area, and after what you need to do at the lab, the cutscene takes you outside. Remember to go back to the room where you fought the minions to loot the two containers there.
    • Same tactics as with the Koshchey will work on Azar, except Azar has wide-area spells and an excellent chance of Blinding you regardless of what defensive talents you have. Keeping your distance seems to greatly reduce the chances of him casting some sort of area blinding effect.
    • Couldn't seem to inflict bleeding or poison from oils, or get any Pain effect. Bombs for Fear, Stun, and Blind also seemed to be useless.
    • It is supposedly possible to keep Berengar alive (and he says something afterwards) but I have not been able to. In the unlikely case where he survives, you do not get any different Quest or Journal update, and all he says is, "I needed to think."


The Witcher - Chapter 4 - Lakeside

Click here for a list of all our walkthrough posts for The Witcher (Enhanced Edition).

Because there is already an official Enhanced Edition walkthrough from CD Projekt RED and an extensive database at The Witcher Wiki, we will only be touching on aspects of the game that are not documented there in-depth, or that you may not have thought about doing.
Decision-consequence videos are at the end.

General
  • To have sex with the Lady of the Lake, you need to investigate the grail legend then talk to her about embarking on a quest. Abort with "A jest." After sex, talk to her again about the Fisher King.
Murky Waters Peasants
  • Random Old Peasant in the village (fisherman only?) gives you a Grindstone once you have killed a few monsters.
  • Random Old Peasant Woman near the Inn talks about Alps.
  • Random Old Peasant Woman in the village proper can be repeatedly given Sugardolls in exchange for herb information.
  • A random Peasant Woman needs information on Garkain. Not certain what the outcome will be if you do not already have the monster Glossary entry.
  • A random Peasant Woman will have sex with Geralt if you can bring her a sugardoll. If you do not have one, you can trade with the Baker for one with a White Honey potion.
  • A random Peasant Woman asks for Perfume.
[Armor: Part One] > [Notes of an Elven Minstrel]
  • The official Enhanced Edition walkthrough is incorrect -- The notes cannot be found in Chapter 4, and although there is quest tracking, there is no quest marker for them.
[Free Elves]
  • This is basically the last chance to choose Neutrality. You choose it in dialogue by refusing to be involved. During the fight, both factions will be hostile to you, but do not necessarily gang up on you unless you are the closest enemy to a particular character. You can stay to kill them all and not affect your Neutral stance.
[Hunting the Wild Hunt]
  • It does not appear possible to defeat the King of the Wild Hunt at this time. Once all the Wraiths have been defeated, the King returns to the circle and leaves.
  • There is a bracket missing in the Enhanced Edition walkthrough -- the Wreath of Immortelles is not found inside the hut, but is instead one of the rewards. The Hermit doesn't tell you what it is for until later; or you may discover it for yourself during dialogue with the character you are supposed to give it to.
[The Heat of the Day]
  • If you are to meet Dandelion at the tree, you must not be on the hill at Dusk. Instead, Dandelion's appearance seems to be related to your approach. You can either follow Dandelion out of the tavern later in the evening, or be some distance from the tree at Dusk and then walk up the hill. if you are already on the hill and let time pass to Dusk or after, Dandelion will not appear.
[Ripples]
  • Fighting Dagon
    • The hardest part is probably clicking on the correct target as Dagon is so big that the game engine often thinks you are clicking on it. It seems impossible to successfully use Group Steel on anyone even though at any one time there can be as many as three enemies (Dagon and two vodyanoi).
    • Do not get cornered by Dagon: He is too tall for you to leap over.
  • After you kill Dagon, the wandering groups of Dagon Worshippers will not have any Priests with them.
[Trophy: The Ancient Cemetaur]
  • Ureus starts behind a wall you need to shatter with Aard. Because he is close behind it, you can use Igni or power-up Yrden to safely kill him or weaken him first.


The Witcher - Chapter 3 - Vizima Trade Quarter

Click here for a list of all our walkthrough posts for The Witcher (Enhanced Edition).

Because there is already an official Enhanced Edition walkthrough from CD Projekt RED and an extensive database at The Witcher Wiki, we will only be touching on aspects of the game that are not documented there in-depth, or that you may not have thought about doing.
Decision-consequence videos are at the end.
General
  • Merchant that sells gifts in the market area can give advice on what to give Prostitutes and the Clerkwoman in City Hall.
  • Random "Townsman" gives the book "Physiologus".
  • Random "Armoured Guardsman" talks about Kikimore Workers.
  • Random "Noblewoman" (in red dress?) who asks for a "piece of a monster" wants a kikimore's claw in exchange for sex.
    • Don't talk to any Noblewomen until you have a kikimore claw. Otherwise you will have to find the particular one you spoke with. Instead, have a claw ready so that when you find the one who will talk to you, you can give her a claw right away.
    • Kikimore Workers spawn in the Trade Quarter frequently at night, or in the Nonhuman District of the Temple Quarter (go the end around the corner where there is a iron-barred door).
  • Random "Noblewoman" (in white?) is looking for her silk scarf. Peddler in the Temple Quarter sells them.
  • "Merchant" near the Bookseller has a message and some dialogue.
  • The Butcher speaks candidly about politicals.
  • Bard - An unnamed bard in the merchant area will speak with Geralt once. If Geralt agrees to pay 20 orens, the Bard promises to compose a song if Geralt will reveal his name. There are four options for a name, but only "Siegfried" results in a song.
  • The Innkeeper in the New Narakort can be paid for gossip three times. You have to leave and re-enter the Inn each time. In one dialogue he gives you the formula for Dragon's Dream.
  • A Townswoman in the New Narakort wants Cow's Milk or beer in exchange for monster information - Basilisk, Wyvern, Archespore.
  • Unlike the Temple District, you do not automatically switch to combat-capable mode at night. You need to click on an enemy to change to combat mode, or an enemy needs to target you.
Swamp
  • The most dangerous creatures here are the Royal Wyverns and Kikimore Warriors.
    • Both can be stunned with Aard, but generally only when their health is very low or if you have enhanced your Aard with a Ritual of Magic.
    • You can wear them down with Igni and luring them to walk over Yrdens. Both are extremely dangerous in melee as a hit can typically take off 15%-20% or more of your Vitality, and inflict a Knockdown. Hit reactions are so short that they can typically hit you before or during your attack chain, and without corresponding animation.
[A Posh Reception]
  • Delay this quest if you want to do both [Echoes of Yesterday] and [Six Feet Under]. You can enter the Inn, but do not go upstairs.
  • When you are discovered taking the scroll from the chest, you can offer a drink. If you offer a beer, it is rejected but nothing happens and you don't have to end up drunk.
[Beauty and the Beast]

[Dandelion's Lute]
> [The Lute]
  • In order to get the sex card in this quest, you MUST get this quest from Dandelion, and you MUST out-drink him to get the story.
> [The Concert]
  • After you return the lute, he can play Poker with you.
  • The "Concert" happens after you exit the Inn and re-enter any time between 8pm and midnight. If you re-enter the Inn outside those hours, Dandelion has an audience, but is only warming up. You can click on him to cycle through his warm-up dialogues.
[Dice Poker: The Sharper]
  • The Gambling Den isn't populated with gamblers till around 1.30pm.
  • If you help the elves in [Gold Rush], Velerad will not gamble with you. You can try to see Velerad before [Gold Rush] by leaving the New Narakort before [A Posh Reception] ends. When Trish tells you to speak with Leuvaarden, all the other guests leave and Velerad resumes his regular schedule. Delay speaking with Leuvaarden and instead leave the Inn.
[Echoes of Yesterday]
  • You can do both this quest and [Six Feet Under] by finishing them both before completing [A Posh Reception]. You are not meant to be able to do this because [A Posh Reception] is supposed to be done on the same evening of the day you first arrive in Trish's apartment.
[Following the Thread]
> [The Supplier]
  • If you give the correct password, you cannot make the guards hostile anymore. After you get the evidence from the drug den, they disappear. If you give the wrong password and they fight you, they are probably worth less XP (probably around 200 XP each, depending on your level) than giving the correct password (500 XP).
> [Gellert Bleinheim]
  •  As soon as you pick up the scroll you need, the City Guard raid the crypt. When all assassins are dead, they leave; you might not even see them if you are busy elsewhere. To kill all the assassins yourself, clear the crypt before picking up the scroll.
[Six Feet Under]
  • You can do both this quest and [Echoes of Yesterday] by finishing them both before completing [A Posh Reception]. You are not meant to be able to do this because [A Posh Reception] is supposed to be done on the same evening of the day you first arrive in Trish's apartment.
  • The Vetala cutscene in the graveyard can trigger while hostiles continue to attack you. Advance slowly until you trigger the cutscene. You will not automatically talk to Vetala until you are closer.
  • For an easier time, clear the crypt before speaking with Vetala.
[The Unforgiven]
  • The chapter finale is VERY rigidly scripted. Don't try to do anything clever.
  • When you attack the Salamandra, endless Salamandra reinforcements arrive periodically. If you delay opening the gate, you will need to clear them so that you are not in combat and can trigger the gate. You MUST open the gate or you cannot continue with the heavily scripted Chapter ending.
  • The Professor
    • Move forward slowly and plant a Yrden. Some Salamandra minions will magically appear. Kill them first, refresh your Yrden trap, then advance on the Professor.
    • The Kikimore Warriors are sort of disinterested (or can't walk past the Workers) unless you are very close. Cast Quen, draw a weapon, and get out immediately so you won't get cornered by the warriors. There appears to be a gap near the lab equipment but you cannot fit through it. Ignore the Warriors as your Alzur's Shield will probably kill the Professor before you can kill even one of them. Focus on The Professor to advance the story.
  • Kikimore Queen - You could kill it if it weren't scripted to be impossible since Igni and Poison both work on percentages. if you do use these spells, you can watch the Queen take damage in the range of several hundred (400+) but here Vitality won't drop below a certain percentage. If you try to fight it, you will just get trapped and not be able to complete the dramatic sequence that the developers intended. Your Endurance is restored at various checkpoints so that you can do what the scripts need you to do.
  • When you run past certain points or do certain things, some kikimores disappear. It is best to simply avoid them and advance the story.
  • In the tunnel, you must stop to kill the Kikimore Workers so that you can loot the body there for a Moon Rune. However, there are five more available in the game during Chapters 4 and 5.
  • Since the Queen starts by tunneling and leaving you alone, you can just sit there until all your health recovers before moving on to do the run for the exit.


The Witcher - Chapter 2 - Vizima Temple District

Click here for a list of all our walkthrough posts for The Witcher (Enhanced Edition).

Because there is already an official Enhanced Edition walkthrough from CD Projekt RED and an extensive database at The Witcher Wiki, we will only be touching on aspects of the game that are not documented there in-depth, or that you may not have thought about doing.
Decision-consequence videos are at the end.

General
  • Jail - Potions in your quick-potion slot are not taken from you at the start of this Chapter.
  • When you first exit the Sewer, both the Order Armourer and the Dwarven Blacksmith will trade with you. They have essentially the same inventory and services at this time. Later this can change due to unknown triggers and you can use only one of them.
    • Since they both sell two blue meteorite ores, you can buy a total of four, plus another from Thaler. You can get two in Chapter 1, so you really only need 1 more to make a 3-blue-ore sword. Since you can get the powerful Harvall sword in this chapter, however, it is actually not important to make a 3-blue-ore sword at all.
    • Sell your armour early to the Order Armourer because no one else will buy it. Later, when you have 5000 orens, buy the improved leather armour. The same armour is available in Chapter 3 if you can't pick it up in Chapter 2.
  • Many characters have the Gift option during dialogue long before you know what to get them or what it is for. It is easiest to just leave it alone instead of experimenting.
  • Salamandra assassins prowl the nonhuman quarter (per the random rumours you get when you talk to the people there). Some time after midnight. Chance of good loot plus almost always a unit of fisstech.
  • Prostitutes (variously named, but not Carmen) - Accepts orens (210) or jewelry (silver ring is probably the cheapest) or gems (amber resale value is only 8) or flowers if you complete Carmen's quest. You can trade food for Roses with the Gardener near the Hospital.
    • This is the same in Chapter 3 -- Gifts of things you found are cheaper than a cash bribe or buying something.
  • A Fleder randomly (?) appears at night in the city, either in the wheat fields beside the hospital or in the or Hairy Bear Inn area. Two ghouls appear at the Cemetary gates at night.
  • Gossip - Keep asking about the witcher. She randomly repeats some dialogue. Eventually you will get one where you identify yourself as Gerald of Rivia. She will ask for a gift (shawl or gem; but gives it back) and asks for gloves instead (or you could directly give her gloves). If you give her the gloves (one pair can be found in St. Lebioda's Hospital), you can have sex with her.
  • Old Woman - May randomly have a dialogue with her where you can give a beer (any mug type alcohol?) to get information on the Golem and the Mage's Tower in the swamp, and information on some monsters. Limited selection.
  • Vertz residence - Opposite the fish stall near the nonhuman quarter. These are NPCs for an incomplete quest that did not make it into the game.
Hairy Bear Inn
  • Conrad, Boozer - No prize for winning a drinking contest with them (?)
  • Random (?) Thug in the Hairy Bear area talks about Berengar and you get a Ramsmeat journal entry.
Sewer
  • The easiest way to kill the Greater Cockatrice is to stun it with Aard and use a finishing move. Otherwise, Siegfried can really help here to draw attention.
  • Lionheaded Cultists - If they are right behind a wall that you can blast down with Aard, you can instead use Igni first to kill them while safely behind the barrier. If you head north from the entrance in their area, you will come to a breakable wall with a lot of cultists behind it. Fry them all with Igni before breaking down the wall.
    • Same with Drowners behind the iron bar doors in the Sewer, but there is only one location where you can use this, and there are only 1-3 Drowners.
Swamp
  • Bloedzuiger
    • Safest way to kill them is probably with Igni incineration at range and let them burn to death. They move slowly, so it is easy to outdistance them.
    • They hit hard and can stun. Group Silver at a distance, by striking a less dangerous creature, is also an option to help reduce their health before burning them with Igni so that they explode at a safe distance.
    • Strong Silver to cause bleeding can also kill them, but be careful.
    • If you do kill one accidentally in close range, pause the game immediately. Rotate to a good visual angle so that you can run right away after you unpause. If you just dodge, you will typically get as far as the edge of the explosion but still be hit. On Hard difficulty, the explosion inflicts two 40+ damage hits.
    • Their explosion can kill nearby enemies, in which case you do not get any XP for those kills.
  • A random Lumberjack will offer to sell some goods, including a Red Meteorite Ore. You will need one for a side quest in a Warehouse in Chapter 3, in the Trade Quarter.
  • The Vodyanoi Altar changes appropriate offerings into one unit of Hellbore at midnight. The Bricklayers say they offer Beggartick, but you don't get anything special from offering that.
  • Wolf-headed Scoia'tael in the Scoia'tael encampment in the Swamp: She speaks only during the day. She can offer a lore book once. If you give her the correct herb, she can teach you to identify and harvest 1 herb (starting with "burmarigold", which is not added to your Glossary). Each day, you can repeat the conversation to learn up to 3 types of plants. You can still talk to her in Chapter 3. She does not teach about new plants in Chapter 3.
[A Long Way From Home] > [The Sacrifice]
  • When Yaren Bolt gives you his axe, it is not an inventory item but a weapon. If your large weapon slots (you have 2) are full, you will drop your secondary weapon. You are then at risk of losing that weapon due to the game not saving loose inventory items on the ground after an area change. Stash one weapon at an Inn first, or remember where you dropped it and go back for it quickly.
[Anatomy of a Crime]
  • The game makes an autosave for you when you enter the Hospital. Do not erase this as the autopsy is very unforgiving of curiosity. If you follow a line of investigation out of curiousity, you can end with an incorrect conclusion. If you already know who the murderer is, all the "wrong" lines of investigation are removed.
  • Even if you do not have enough information, you can investigate the Crypt in the cemetary or question Raymond to arrive at the correct answer.
  • Whether you have the correct answer or not, the fight at the end of Chapter 2 is essentially the same, with only different beginning and ending dialogue.
[The Drowned Dead Contract]
  • If [Force Recon] is available, Siegfried will move to the Swamp but Quest Tracking for this quest will still point to his post. He will acknowledge the quest in the Swamp.
[The Echinops Contract]
  • This can be fulfilled right away with any rootstalks, including the ones acquired during Chapter 1. However, you would have needed to get the echinops bestiary entry from an Old Woman in Chapter 1 in order to harvest rootstalks from the echniopsae in the Cave.
[Flowers and Gold]
  • Once you have 5 Beggartick flowers, you cannot ask anyone about them.
  • Once you have started [A Pilgrimage], you cannot ask Gramps about them. You cannot ask him about them after [A Pilgrimage] either.
[Force Recon]
  • Since this battle takes place at the Golem Burial Ground, you can use the Pylons to kill a lot of combatants quickly, but you get no XP. Just don't draw your sword.
[A Ghost Story]
  • The Half-Elf's house is one of the few places to get Wolf Aloe.
[A Mysterious Tower]
  • If you defended Haren's goods from the Scoia'tael, the Scoia'tael that Haren betrayed are hung at the gallows near the Order stronghold. Vivaldi is in jail and when you bail him out he gives you both books that you need to advance this mission.
  • After getting the Sephirot from a Melitele shrine, you can continue to donate fruits to exchange for 1 Mistletoe per fruit.
  • Even without the books and Kalkstein's notes, you can place Sephirots in the monoliths in the Swamp, but apparently you do not receive +100 XP each until you have Kalkstein's notes.
[A Pilgrimage]
  • Do NOT accept / start this quest until you have gotten the quest from Jaren Bolt of the loggers to get Beggartick blossoms. You can then talk to Gramps about Beggartick. If you are already on [A Pilgrimage], Gramps won't talk about the flowers.
  • For a full tour of the Swamp, take Gramps to: Clay Pits, Tower, Druid Grove, Cave (don't have to go inside), trio of islands with Oth Obelisk.
  • Gramps flees from all encounters so it is unlikely that he can be killed, but he can take damage. His targeting ring is green so you cannot harm him.
  • You will probably encounter the Cocciacidium. It is very dangerous to engage because of its incredible damage output and attack frequency. Instead, retreat immediately out of range, but not so far that it burrows back into the ground. Use Apprentice-level Igni to hit it safely from range.
  • He has the quest book "Ain Soph Pur" in his home which you can take for free, but you can also buy that / get that from Golan Vivaldi at the same time you get the other book from Vivaldi.
  • If you are on this quest and you enter his house, you will break the quest that is supposed to trigger AFTER you have successfully brought him to the Altar. After escorting him to the altar, he invites you to his home. You are supposed to enter his home at that time to trigger the quest there.
[Old Friend of Mine]
  • You can start this quest by speaking with Shani anywhere. If you can't get past Grandma in her house or can't get into the Hospital yet, just wait till morning and talk to her when she heads to the Hospital.
  • Grandma:
    • Has random dialogue so the requirements for getting past her can change. The easiest way is to get a ring from Bootblack: Drink with Thaler for the book "Shadow People, or the story of His Majesty's Secret Service". Gift it to Bootblack for the ring.
      • Note that if you use this on her even once, her response to you will be locked. You may want to hold off and experience her various responses as well as the sneaking about during the party.
    • Appears to be a healer. If you enter the house while injured, during the cutscene where Grandma approaches you, you should receive healing.
  • To get into the Hospital without any hassle, get the City Guard Ring from Vincent Meis if you have enough evidence to find him innocent of working with the Salamandra against you.
  • Party:
    • Once [Force Recon] is available (after you deliver Yaevinn's letter to Vivaldi in [Worth Its Weight In Gold]), you can no longer invite Siegfried as he will not leave the Swamp for the rest of Chapter 2, and [Old Friend of Mine] cannot be continued in Chapter 3.
    • Go to the party at night. After Shani's party, you need to speak with her again to properly close the quest. If the party ends during the day, she will resume her routine instead of going to sleep and you will have to wait until she comes home from the hospital to close the quest.
    • During the party, you will need to get a quest item from downstairs. However, these items are available even before the party, so you could grab them before heading up.
[Suspect: Leuvaarden]
  • You can get a clue (and the sword Harvall) in the Swamp. Northwest of the Collapsed Tower and west of the Scoia'Tael camp there is a flight of wyverns and a Messenger's Corpse.
    • To fight the Wyverns, move forward slowly to cautiously draw one at a time. Lead them to a Yrden and let them hurt themselves repeatedly running into/through it. When they are weak, hit them with Aard to stun, then kill them with a finishing move. Aard enhanced with a Ritual of Magic has a decent chance of stunning them. They have a limited pursuit radius, so running away will eventually shake pursuit.
[Suspect: Thaler]
  • Click on the "Mysterious Man" who shows up outside Thaler's door at 11.30pm to receive XP and another clue.
[The Rat] > [Ghosts]

  • Against the two wraiths, Group Silver can work, but it is hard because they move back quickly and very far. Instead, dodge around and burn them with Igni. If it is safe to do so, use Fast Silver.
[Vizima Confidential]
  • If you let the Scoia'tael take Haren's goods in Chapter 1, then they will kill Coleman in the Hairy Bear Inn. This happens after you have seen Raymond at least once, and the next time you enter the Hairy Bear. Once the dialogue cutscene is over, Coleman's corpse lies on the floor near the entrance. However, you can also find "remains" in the same room where Ramsmeat sits (if not, save the game and reload to see if it appears). These remains have 350 orens you can take.
  • Entering the Mage's Tower locks you into ending Chapter 2, which also closes off some quests. Clear all the quests you can before entering the Tower.
  • You can plant a Yrden outside before going into the tower and it will be active when you get out. A good place is to the left of where Raymond is standing when you first meet him at the Tower.
  • You don't have to do a lot of fighting: Depending on your skill with Yrden, one or two will kill the Ifrit for you. It can also keep Azar and The Professor at bay. Use Axii on the Professor and he will fight Azar for you. When either of them take too much damage, the escape cutscene will appear.
  • Because Azar and The Professor are still plot critical, neither of them can be stunned or killed. You cannot also push them with Aard or attacks into the fire barriers. They cannot be pushed close enough to take fire damage.
  • Golden Oriole will not affect the outcome of the cutscene.
[Witcher's Secrets] > [The Private Eye]
  • You won't leave till midnight when you talk to Raymond for the first time.
  • If you let the Scoia'tael take Haren's goods in Chapter 1, after seeing Raymond Coleman will die. Also, since Haren did not betray the Socia'tael, there will be no corpses at the gallows near the Order stronghold.


The Witcher - Chapter 1 - Outskirts of Vizima

Click here for a list of all our walkthrough posts for The Witcher (Enhanced Edition).

Because there is already an official Enhanced Edition walkthrough from CD Projekt RED and an extensive database at The Witcher Wiki, we will only be touching on aspects of the game that are not documented there in-depth, or that you may not have thought about doing.
Decision-consequence videos are at the end.

General
  • Shani is a healer. If you are severely injured and walk close to her at the Inn, she will get up from her stool and cast a healing spell. This can be handy if you are farming the fistfighters for money.
  • There are only three bestiary entries you need to get from books: Barghest, Dog, Wolf. You can get the books from Abigail or the Antiquary.
    • You can get a "Tome of Fear and Loathing I" by out-drinking the Drunkard in the Tavern. If you do not, out-drinking the drunkard in the Hairy Bear in Chapter 2 will get you a book (nothing otherwise; probably a scripting error).
  • You can get monster and herb information from Old Townswomen and Old Women by gifting them food. Keep all fruits (including dried fruit) because you can swap them for Mistletoe (an ingredient you cannot harvest anywhere) in Chapter 2. 
    • You can do this in the early game when money is tight. But you will in general want to buy the books anyway for the remaining information on ingredients you can harvest, either from plants or monsters.
  • You can earn an unlimited amount of orens in various tedious but easy ways:
    • Winning fistfights: Each time you meditate in the Inn or exit-and-enter, the unnamed fighters recover and are ready to fight again. You can at most double the initial bet.
    • Collect herbs/ingrdients and sell them.
    • Collect Barghest skulls and sell them to Abigail. She initially pays 100 orens for 10 skulls per the Contract, but at any time (through her store) will buy 1 skull for 5 orens. She stops talking after [Of Monsters and Men] so make sure you unload any unneeded skulls prior to the finale of this Chapter.
      • You need at least 1 Barghest skull later in the game. You should be able to get this during the fight with the Beast.
  • Since it is easy to get money, you might as well shortcut the process using the genie in this convenience/cheat mod to get 10,000 orens each time you conjure him.
  • When you buy an alchemical concoction through dialogue from Abigail or the Dwarven Smith, you also get the formula.
  • Later in this chapter, the Beast will start coming for you. At various points on the map, there will be a brief cutscene of the Beast, then about 3 Barghests will spawn nearby. During the cutscene you can use hotkeys to draw your sword.
  • Closer to morning (around 4.30am or 5am), Barghests will continue to spawn at their usual locations or from Rabid Dogs, but they flee and disappear, presumably because it is too close to morning.
  • The Abandoned House with a corpse (dead body, not skeleton) has a Ghoul in it at night.
  • You can sell weapons to the Dwarven Blacksmith. Just open his smithing dialogue whether you have ore or not.
Unnamed Villagers
Some villagers have dialogue that sometimes results in interaction. Some of this appears to be random, so clicking on the same type of villager (i.e., different villager with the same name) could produce different results.
  • Traveler. This is a fat merchant in dark clothes (sometimes there is one in lighter-coloured clothes) -- looks like Leuvaarden. He always gives you 100 orens once.
  • Townswoman near Chapel, wearing white dress
    • Trades Daisies for Tulips.
    • The first one you encounter and give Daisies to will warn you about the Salamandra waiting to ambush you, but you can't really do anything with that information.
  • Old Townswoman in the village with the Chapel
    • Typically they accept money or food in exchange for telling you about a monster. You can only get information once per Old Townswoman.
    • One will ask for Pork (only from the Street Vendor, for 5 orens) and give you a bottle of wine.
  • Old Woman in the village south of the village with the Chapel.
    • Give them one unit of food to get information on a monster or herb.
    • They have a limited number of monster information entries you can learn, and do not repeat any entries. You can learn about Echinopsae here and properly harvest ingredients from them.
    • They have a limited number of herb information entries you can learn, and randomly draw from that list. Repeats are possible. List is: Balisse, Beggartick, Berbercane, Hellebore, Sewant, Verbena, White Myrtle, Wolf's Aloe. This list includes everything you can harvest in the Outskirts.
    • Reset their dialogue by going into a building and coming out again.
  • Peasant Woman
    • Sometimes one will actually have a dialogue with you. If you give any flower other than a Tulip, they give it back and ask for a Tulip.
    • If you give a Tulip, you can have sex with them.
  • Beggar
    • Old woman Beggar in the village south of the Chapel asks you for White Gull. Gives you a Ring of Eternal Fire. Since you can easily get one from the Reverend to do the quests in this Chapter, it is not clear how having a second one will help.
    • A Beggar near Haren Brogg's house mentions Nadir the Drowned Dead boss on the mill side of the water.
    • A Beggar at the west bridge into the city asks for alcohol. It appears that he will accept Strong alcohol, but it seems to lead nowhere.
[Buried Memories]
[Ghouls]
  • If for whatever reason you do not have a Cat potion, you CAN fight in the dark by turning on item names or pressing Alt to locate items you can click on -- including enemies. Since even human enemies can fight you in pitch darkness, this isn't really such a huge cheat as it is an equalizer.
  • Against Ghouls, use Aard with Stun, further enhanced by performing the Ritual of Magic at the Circle of Power outside. Note that if they come too close to you when you cast it, even though there is no attack animation, they can still land a hit on you. You can outfight them, but two-on-one can result in losing too much Vitality to continue exploring. Instead, withdraw and wait for your Endurance to recover and hit them with Aard again.
  • If you move forward slowly enough, you can typically draw a single ghoul from a pack and handle them one at a time.
  • At the Circle, touch it once to learn Igni, and then again to receive a temporary boost to your Igni skill.
[Mikul's Trust]
  • When you can report success to Mikul, there will be a fight against Salamandra on the bridge. Pretty straightforward by using Group Steel. Depending on your choice in the Prologue, you get different foes to fight. Contrary to the official guide, the encounter for having protected the lab is probably harder because after the cutscene with the mage, you are facing the wrong way and the Salamandra goons typically all get a free swing at you. Also you are subjected to a fire attack (presumably from the mage) and often get an Incineration effect on you very shortly after, with the possibility of fear from the flames stopping you from doing anything at all.
    • After the cutscene and black screen, pause the game immediately. Draw your sword. Whether the animation of you drawing is complete or not, just double-click behind the guards to jump over them as soon as possible. If you paused early enough, you might not be stuck in a hit reaction. If this doesn't work for you, jump away from them and toward the mage, which you will want to take down first anyway.
  • When you report success to Mikul, talking about the dead girl in the crypt ends dialogue with Mikul until he goes to his new post. You cannot therefore ask about the dice you found in the Crypt (assuming you don't already know about them).
  • He mentions that his friends intended to clear the blocked tunnels and loot the place. You immediately go back to the Crypt to kill the alghoul boss Ozzrel for the unmarked Royal Huntsman's quest King of the Crypt. Empowered Aard with stun for coup de grace will also work on the boss.
[Dead Hand of the Past]
> [The Cave]
  • To the left of the entrance are some tall rock formations. Start by going left and hitting the Echinopsae that spawn about 2x with your torch, then run behind one of these rock formations to get cover from their shots. Just wait for them to burn to death. The ones here, unlike the ones in Odo's garden, do not retreat into the ground to recover.
  • To get information on Echinopsae so that you can harvest ingredients from them, you need to speak with random "Old Woman" characters, offer them food, and ask about lore. One of them will eventually tell you because they draw from a limited pool of monster lore and do not repeat information that they have already given you.
> [Burial Place]
  • You do not need to consult with Leuvaarden first before seeing the Reverend.
  • When you bury the remains, you will meet the King of the Wild Hunt and have some dialogue choices.
    • Only one choice results in not fighting Leo even though your Journal indicates that you did, suggesting this is a bug. Not fighting Leo means you do not get a piece of Red Meteorite. This is one of three pieces in the game.
      • To reach this choice, choose "no destiny", say the phrase does not sound familiar, and recite the phrase as a vow.
    • When the King of the Wild Hunt asks if "You will give me what you have but do not expect" is familiar, this is a reference to the standalone adventure "The Price of Neutrality".
[The Secret Garden] > [Plants]
  • Draw a torch immediately. This puts you into combat mode and you stop staggering around drunk, although you will still have penalties for drunkenness.
  • Hit the Echinops with a torch a couple of times and retreat. Don't go too far or it will bury itself and come back fully healed. You want incineration to kill it for you because in melee, it does about 3x more damage than when it shoots at you.
  • If you speak with the dog afterwards, you deduce that it is guarding something but you cannot do anything about it. Given the lore behind the Echinops, and what is revealed at the end of Chapter 1, we can suspect that Odo's brother is buried in the garden.
    [Strangers in the Night] > [Elves] DECISION
    • If you allow them to take the goods, you apparently get to keep the gold as there is no indication that you surrendered it to Haren Brogg.
      • In Chapter 2, do NOT see Raymond until you finish [Hot Potato] and [The Rat].
    • If you defend the goods, when you report to Haren Brogg you can ask him to find Hoog of the Scoia'Tael for Zoltan. This option does not appear if you let the Scoia'Tael take the goods and there is no follow-up on Hoog later. This may be an early dialogue related to the consequence of choosing this option, which is revealed in Chapter 2.
    [The Salamander's Tail] > [The Hideout]
    • This is the same location where the village children converge during the day to play and say creepy things. Their behavior may be the reference to children killing the Witch's cat during the seance with Alvin.
    • The initial entry is tough because when you transition into the building, the script forces you to sheath your weapon and it deselects your magic Sign. Pause the game, select Aard, and blast them to buy you space; or just select a weapon and leap out.
    • When you first click the Trapdoor, you receive confirmation that Haren Brogg is trading with the Salamandra, but you cannot confront Haren about it at this time.
    [Of Monsters and Men]
    • Information on the Beast from Abigail. After the seance with Alvin, read the documents she gives you. You can then talk to Abigail for some non-essential dialogue.
    • Fighting the Beast:
      • The Beast can inflict Pain, possibly from Incineration by its fiery aura. This is probably the most dangerous situation. Try not to engage it one-on-one. To hit it, use Group Steel on nearby Barghests.
      • If you have Group Steel with Trip (knockdown effect), be careful that you do not click on a Barghest that is knocked down because during the finishing move, you are too exposed to the Beast and any other Barghests. This is an easy mistake to make. If everything has been knocked down, just reposition, use Igni, or use Aard on the Beast.
      • There is enough room to run or dodge around quite safely. Do this while you recover your Endurance so you can use Aard again. Aard with stun is the safest (and cheapest) way to kill the Beast. In fact, if you start this fight with Aard, you could get lucky and stun it before it can do anything.
      • Once The Beast dies, any Barghests it has summoned also die. Remember that you need at least one Barghest skull for Chapter 4.
    • If you side with Abigail...
      • She periodically casts a healing spell. She is plot-critical and cannot die, but can be rendered unconscious.
      • After fighting the Beast, villagers attack her. If you attack them, the cutscene will still take over, during which time the villagers will continue to attack you, but you cannot do anything. Instead, just let her be attacked and wait for the cutscene. She may or may be rendered unconscious, but since she cannot be killed, it is not a big deal.
      • She takes Berengar's notes on the Beast.
    [She's No Early Bird]
    The escort part of this quest includes Barghests spawning at two points, which happen to be fairly close to the roadside shrines to the Eternal Fire. These shrines also spawn groups of Barghests if you are on the quest for the Reverend to light the shrines, which means you could end up fighting some pretty big groups. If you are having problems fighting them off or keeping Vesna alive, you can avoid this by clearing them first:
    • Vesna and the thugs appear at night, and will re-appear each night until you trigger the encounter by getting close. When you first get to Chapter 1, stay in or around the Inn until closer to morning when the encounter disappears. Before nightfall, make sure you are not near the Inn, where the encounter begins. Go to each shrine and kill the Barghests, then head back to the Inn to rescue and escort Vesna.
    • Optionally, if you don't want to handle the Barghests, you can go the long way to her house -- That is, head in the direction of Abigail's, continue toward Mikul's post on the east side, and crossover via the shore to the village where Vesna lives. The two Barghest spawn points for this mission are near shrines of the Eternal Fire in the other direction, and deactivate once you have escorted Vesna home.


    The Witcher - Prologue - Kaer Morhen

    Click here for a list of all our walkthrough posts for The Witcher (Enhanced Edition).

    Because there is already an official Enhanced Edition walkthrough from CD Projekt RED and an extensive database at The Witcher Wiki, we will only be touching on aspects of the game that are not documented there in-depth, or that you may not have thought about doing.

    Extra Dialogue
    Talk to everyone in between phases of a quest to get dialogue and tidbits of information. Most of it is non-essential dialogue, but some of it might be of interest to you. Key times are:
    • After you open the gate to the upper courtyard, and before you enter the keep for the first time with Leo. Talk to everyone.
    • After you have cleared the upper level of Salamandra while looking for ingredients for the Potion for Triss, and before you go out to harvest ingredients from the Frightener. Talk to everyone.
    • After you have created the Potion for Triss. Talk to Lambert.
    • After you give the potion to Triss, but before you end the Prologue by going to the funeral. Talk to Eskel. This is a non-essential start to the Fistfight quest.
    [Defending Kaer Morhen]
    • After you learn Aard, click the Circle again to receive a temporary boost to Aard.
    • DECISION: [The Frightener] or [Protect the Lab]
      • Frightener
        • You can use any three pieces of Meteorite to forge a sword, but you cannot get special bonuses unless you use three of the same.
        • When you talk to Vesemir later when he is in the main hall and gives you instructions on how to get the Frightener ingredients, he gives you a Red Meteorite IF you pursue the dialogue topic "Do you and Triss argue often?". With this piece of Red Meteorite, you can have a 3-red-ore sword by Chapter 1. Otherwise you will have to wait till late Chapter 2. Either way, it is not an essential weapon.
        • Because the Frightener cannot be hurt unless both cauldrons and the bell are sounding, you can take your time with this mission and save the Tawny Owl potion for later. There is also a lot of room to move, so there's little reason you will need Swallow unless you got hemmed in at the start and took a beating.
        • Make sure you land the final blow to get the kill XP.
      • The Lab
        • After you give Triss the potion to heal her, she teaches you the formula for the Cat potion. You get "The Book of the Swallow" at the start of Chapter 1 no matter what, and it includes the formula for Cat.
      [A Potion for Triss]
      • After you successfully make the potion, you can go back upstairs to the Evening Hall and the Crate there to get another Calcium Equum.

      The Witcher - Talents - Axii

      Click here for a list of all our walkthrough posts for The Witcher (Enhanced Edition).

      Axii is used to mind-control a target at a safe distance so that your enemies can fight amongst themselves and thereby thin their own ranks.

      • You do not get XP when an enemy kill something.
      • At closer distances, there are many other more useful spells than controlling a single target as a distraction (and one that won't last long if there are many enemies about), and therefore spending Talents on Axii is redundant or and inferior choice.
      • Where Axii can shine is in controlling a powerful enemy, but that situation is really too rare to count on.
      • On top of these difficulties, in late Chapter 5 till the end of the game, numerous enemies are outright immune.
      • The Axii power-up is an area-effect Fear, but you can do the same more conveniently with a bomb or with Agni and the appropriate subskill.

      Overall, I recommend giving the entire Axii skill tree a pass.

      The Witcher - Talents - Igni

      Click here for a list of all our walkthrough posts for The Witcher (Enhanced Edition).

      Igni is probably the most overpowered sign and unless you are deliberately trying not to win with cheapshots, you should develop it quickly and take almost all the upgrades.

      • Fill it out to level 4 but leave the fireball power-up at Apprentice level.
      • Burning Blade is only for Group Steel level 4, so if you don't use that frequently, you can skip this and save 1 Silver Talent.
      • Since one shot of Igni is worth several rounds of combat, instead of developing up to six combat styles, just develop Igni (especially with the Added Efficiency upgrade).

      There are various quirks to Igni that you should plan around:
      • The fireball version is stupid. When you have clear line of sight, it generally works fine. Anything other than clear line of sight can result in what appears to be a hit, but is actually just the fireball sizzling out harmlessly. Or it could crash into a collision box you were not expecting and be blocked. Or the opponent could actually be out of range or in an inaccessible area, and after draining the Endurance cost you just get a "spell failed" notice. Do not rely on it hitting anything.
        • Leave this at Apprentice unless you have somehow mastered the art of throwing fireballs reliably.
      • The fireball version charges up so slowly, and flies so slowly, that you really need a static target to have any chance of hitting. Fortunately, even at Apprentice level, you might be able to launch it further than a creature's sight range. If you can manage this, they might not move toward you, so you can just blast them again and again.
      • Igni forces the enemy to retreat back a few steps no matter how much or how little they are affected. This gives you immediate relief from behind surrounded. Because of its very wide arc, this is better and safer than powering up Aard to hit a wide area.
      • Damage and Incineration works on percentages. If you use it on the Kikimore Queen, you might see damage in the 400+ range. For this reason it is very powerful. It also has strong base damage so that in the late game you can sweep aside Drowners with a single cast.
      • The standard fire wave attack can go through barriers you'd normally blast aside with Aard. You can therefore just leave the barrier alone and instead first safely fry any enemies behind the barrier.
      • With three special effects, you have an excellent chance of triggering at least one on each target, making the standard Igni fire wave extremely powerful at scattering masses of enemies. While they run in Fear or stand helpless in Pain, they are typically also burning to death from Incineration. Prioritize getting more status effects over getting damage.
      • If you are tight on Gold Talents, you could just leave Igni at level 4, which has nearly a 360 degree arc already.