Thursday, January 17, 2013

Warhammer: Mark of Chaos - Empire Campaign - Chapter 2, Mission 1

Here are general tips for playing the Empire Champaign in Warhammer: Mark of Chaos, on HARD Difficulty. A list of all our Warhammer: Mark of Chaos articles can be found here.
We won't be hand-holding you through absolutely everything, but instead just give tips on situations that we found tricky or that you might not have considered.

Chapter 2: The Hosts of Ulthuan

Mission 1: Minions of the Under-Empire

Overview
  • A really easy mission if you can avoid getting blasted by the Lightning Cannon. Otherwise, just bring lots of handgunners.
  • Securing the Mustering Horn (standing a unit near it for 30 seconds) will call reinforcements for both yourself and the skaven.
    • Once the Horn is secured, almost the entire skaven camp will mobilize and move toward you.
    • Allied Level 3 Knights and Level 2 Handgunners will come from the east. They will largely be ignored until they kill the Skaven Warlord. As they exit the map, StormVermin will slaughter them.
    • Skaven will also receive light reinforcements from the west.
  • Walking in between the plague clouds is tricky as the unit could still be diseased without you being aware. There is nothing visible on the unit if it has the plague -- just a chance that a model will suddenly fall dead.
    • The safest way past them seems to be going around to the west, hugging the western mountain base.
  • "Destroying" the altar of vitality transforms it into a non-regenerating shrine for the empire that can give you units. Since this is quite an easy mission, you might consider not filling out your regiments prior to the mission and using the altar for 50 HP worth of units.
  • Destroying the skaven camp means destroying the Warpstone Pinnacle. Leave it along if you want to use the Altar of Vitality last.
  • Not sure if you can do anything with the Neutral Helblaster Volley Gun during the mission but you get it at the end of the mission.
Walkthrough
  • Sight the Skaven Lightning Cannon and units nearby with your Hunters, who have a long sight range. Move your cannon just enough to hit and draw the units around the cannon. Clear them before rushing the cannon with just the Captain.
  • Deploy in the southeast. You are too vulnerable to being sighted by the lightning cannon. The Stormvermin near it cannot let it target you for some reason, but the Poisoned Wind Globadiers can.
  • At the ridge west of the horn, you can set up your cannon and Hunters. Hunters can hit the patrols, drawing them up to you one regiment at a time.
  • Shell the enemy until the Warpstone pinnacle is used up, then advance on the camp carefully.
    • If you do not approach the camp, the enemy regiments will stand still while you continue to bombard them. Do this if you think you cannot handle the horde.
    • If you deploy on the ridge west of the horn, you might be able to slow the advance of the skaven horde by getting them into a traffic jam as they turn up the hill.
    • When you get close enough to the camp, all but one regiment of Stormvermin will start walking to you. The Warlord will remain behind. Reinforcements will come later.
    • When you get close enough to the Warlord (going farther into the camp than is necessary to trigger the skaven army moving), he will move, but will go back if you pull back far enough away.

Warhammer: Mark of Chaos - Empire Campaign - Chapter 1, Mission 6

Here are general tips for playing the Empire Champaign in Warhammer: Mark of Chaos, on HARD Difficulty. A list of all our Warhammer: Mark of Chaos articles can be found here.
We won't be hand-holding you through absolutely everything, but instead just give tips on situations that we found tricky or that you might not have considered.

Chapter 1: The Call of War

Mission 6: Gotterung, Stronghold of Darkness

Overview
  • Time is quite short but it's possible to win without taking the outer siege point. In any case, it seems that the outer siege point only adds a couple of minutes.
  • You will need to get close to all items in the fortress courtyard to count as "found" and have the game automatically pick up when you win. Also, regiments that charge your cannon can drop items, so it actually helps if you don't win too quickly. We got a total of 5 items plus some gold.
  • Infantry regiments can have a siege tower or a gunpowder barrel, but not both. A single gunpowder barrel will not destroy a section of wall.
  • In the far northwest corner outside the fortress and from where the Marauder reinforcements march is a SteelThread Cloak (+1 Armour, +3 Magic Resistance) that is probably not worth the headache to get. You need a hero to pick it up. Sending a regiment there won't allow them to pick it up and you won't automatically get it when you win the mission.
Walkthrough

Method 1: Rush for Inner Siege Point

If you are really having a lot of trouble getting through this mission, just go for the quick win.
Get some swordsmen up the wall fast, and then rush down into the courtyard for the inner siege point. Turn on all defenses (Captain's Armour of Contempt skill, Swordsmen's Shield Parry) and capture the siege point for a quick win. You'll probably take horrible casualties on the Swordsmen and possibly miss grabbing the Armor of Retribution (dropped by the Chaos Knight regiment).

Method 2: Clear the wall, grab courtyard items, take Siege Point

  • We managed to do this with just 11 losses, but it is very tough, for several reasons:
    • If you don't micromanage your cannons, they can blast your own troops while targeting the enemy or taking down a wall section (collapsing a wall also kills all troops on that wall section).
    • Sometimes regiments just get stuck and can't do anything or move very slowly and won't attack. It helps to have ranged attack regiments because they can kill some enemies and hopefully cause the traffic jam to clear.
    • Sometimes regiments will walk down stairs to get to the nearest enemy they spotted somewhere, so you might need to micromanage their targeting, especially melee.
  • Bring into the mission 1 regiment of swordsmen fully upgraded, and four handgunner regiments.
    • Leave two handgunner regiments to support the defenders at the cannons. They can mostly go on automatic targeting except when the knights come, whereupon you will probably want to Volley Fire the enemy.
    • Attach Captain Von Kessel to the swordsmen. Leave the Bright Wizard unattached.
  • Send the Bright Wizard ahead alone.
    • Yes, alone. Not even armoured -- prioritize the Captain for armour rating.
    • A single model is pretty hard to hit with a cannon, and even if it were hit, a hero can survive a couple of shots.
    • Rush the Wizard to the corner of the fortress so you can keep the Hellcannon there sighted for your own cannons.
  • A few seconds after you get the Wizard running and drawing cannon fire, send up the swordsmen and the two regiments of handgunners. The swordsmen should take the lead so they will draw axe thrower fire first. At the base of the wall, turn on all defenses on the swordsmen and head up. Attach the Bright Wizard to the nearest handgunners, then send the handgunners up the wall as well.
    • Ideally the handgunners should have the Swordsmen in between them and any enemy melee regiments, so that they can keep up their shooting. If you are able, garrison them in a tower, but beware of enemy regiments trying to retake it.
  • The enemy will pour out of the fortress but your assault force is now on the battlements, so they can only head to the cannons.
  • If the HellCannon is destroyed, turn them on enemy regiments instead of the walls. Try to keep an eye on the cannon position to make sure your handgunners still cover it and the cannons haven't drifted too far ahead as you manually target them.
  • Once you have cleared the battlements, the castle will probably be empty. If you have a few minutes left, turn your attention back to the cannons and their defence. Finish up any enemy regiments, then capture the inner siege point for the win. Items on the ground should be automatically grabbed when you win.

Empire Campaign Chapter 1 Mission 6 result

Warhammer: Mark of Chaos - Empire Campaign - Chapter 1, Mission 5

Here are general tips for playing the Empire Champaign in Warhammer: Mark of Chaos, on HARD Difficulty. A list of all our Warhammer: Mark of Chaos articles can be found here.
We won't be hand-holding you through absolutely everything, but instead just give tips on situations that we found tricky or that you might not have considered.


Chapter 1: The Call of War

Mission 5: Green Blockade (duel)

Overview

Orc Warboss L10. If you are having trouble, just keep up the Parry skill (even at rank 0) and you should win by attrition.

Since the next mission is the last one in this Chapter, after this mission is the last chance to buy whatever you want from the stores/camp.

Warhammer: Mark of Chaos - Empire Campaign - Chapter 1, Mission 4

Here are general tips for playing the Empire Champaign in Warhammer: Mark of Chaos, on HARD Difficulty. A list of all our Warhammer: Mark of Chaos articles can be found here.
We won't be hand-holding you through absolutely everything, but instead just give tips on situations that we found tricky or that you might not have considered.

Chapter 1: The Call of War

Mission 4: Retribution (Erstedorf)

Overview

Overall a pretty easy mission, just a lot of running around. It is pretty hard to lose this mission as long as you are not careless and expose your regiments to too much direct combat, since a lot of buildings need to be razed for the mission to be considered a failure.
Having a lot of shooting regiments also helps as time is really not on your side, and melee tends to be a slow grind. Move your entire army around as concentrated fire to destroy each enemy clump is better than trying to protect multiple fronts.

If you lose any models, it is probably because you were not able to move the Captain in front to draw fire, or from the Aspiring Champion's Axe of Doom throw, against which you can't really do anything about.

Remember to grab the banner from the farmland way outside the town proper. It is probably impossible to save those buildings, and even if you did, it would mean you would miss out on the items dropped.


Warhammer: Mark of Chaos - Empire Campaign - Chapter 1, Mission 3

Here are general tips for playing the Empire Champaign in Warhammer: Mark of Chaos, on HARD Difficulty. A list of all our Warhammer: Mark of Chaos articles can be found here.
We won't be hand-holding you through absolutely everything, but instead just give tips on situations that we found tricky or that you might not have considered.

Chapter 1: The Call of War

Mission 3: Green Dawn (optional)

Overview

Same tactics as before. Focus on getting Armour for Von Kessel, with Tenacity, then saving points for Armoured from the Combat tree. His armour should be 7, or 9 with Armour of Contempt, and enough to easily survive melee without fear of losing too much HP as long as he is supported by handgunners and fireballs from the Bright Wizard. For this mission went with as many handgunners as we could.

Refill your regiments before going in and your barrages and Volleys should be pretty devastating and help you win. Fireball whenever you can to soften up the enemy but don't immediately charge into battle to help Von Kessel if he doesn't need it.

Against the Giant, you can either go around the west and avoid it, or attack. Detach both heroes and attack it, but really you are just buying time for your three regiments of handgunners to shoot it to death.
For the orc camp, fireball the nearest regiment and retreat (or if the regiments move, pull back until they turn back). Try to pull just one or two regiments. The Night Goblins can poison, but this doesn't seem to do much to Von Kessel so make sure he is in front. There is no particular urgency to engage them in melee as the Captain should have enough armour to survive getting shot at.

This is the last chance to buy items in the current store as it will change after the Erstedorf mission.

Warhammer: Mark of Chaos - Empire Campaign - Chapter 1, Mission 2

Here are general tips for playing the Empire Champaign in Warhammer: Mark of Chaos, on HARD Difficulty. A list of all our Warhammer: Mark of Chaos articles can be found here.
We won't be hand-holding you through absolutely everything, but instead just give tips on situations that we found tricky or that you might not have considered.

Chapter 1: The Call of War

Mission 2: Saviour

Overview

Prior to this mission you will have gotten a regiment of halberdiers and had the opportunity to resupply at at Garlech.
  • The halberdiers are there to help you against trolls in this mission. However, in general, having a lot of shooters (in this case, handgunners) is more useful overall, so we recommend not upgrading them and instead buying as many ranged units as you can in all of Chapter 1.
  • Aim to develop about 6 ranged regiments. Hunters are okay, but they are mainly scouts and  unless you have no more handgunners to deploy, just deploy only one regiment of hunters.
  • You start with 6150 gold (assuming you got all the gold in the last mission) but that is actually not a lot. Don't splurge but buy the basics: Extra Handgunner regiment, best weapons and a Champion for all Handgunner units.
  • At this point, we also recommend full upgrades for a single regiment of Swordsmen, who at this early stage of the Empire campaign will still need to block for your shooters, and in any case you will need them in sieges to secure the battlements.
At Garlech, you can buy two magic items:
  • Blade of Slaying (+15% hit)
    • Looks great, but skip this. You can get something more useful in future missions.
  • Staff of Transference (more Mana).
    • Buy this and give it to Von Kessel. Makes a lousy weapon, but more Mana means more fireballs from your Bright Wizard.
    • You will get a Staff of Sorcery from Mission 2, which is probably more usefully given to the Bright Wizard.
Walkthrough

Take point with a mounted Von Kessel and try not to let him get surrounded.
  • If there are only melee units, lead them about as much as you can to let handgunners fire while they chase uselessly.
  • If there are missile units, quickly break through and engage. He just needs to delay them and reduce overall attacks directed at our regiments. Use Handgunner Volley Fire and Bright Wizard Fireball to break the immediate enemy in front if he cannot ride around the battle.
  • Overall, try not to pull too many enemy regiments and watch for patrols that can come to you. Most enemies guard a position and will withdraw back to their start if you move away far enough.
  • Don't chase broken units - Just let them reform and come back, and let your handgunners shoot them.
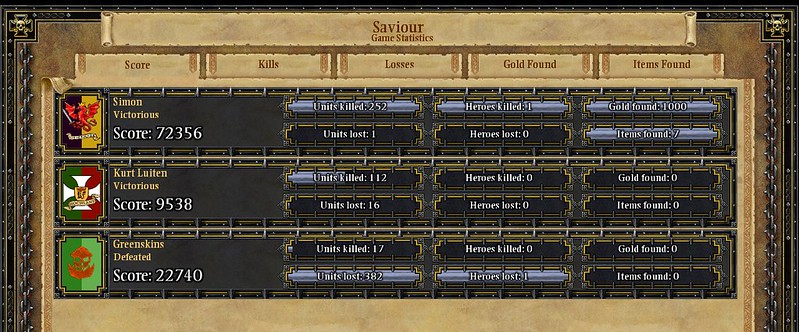
We ended this mission with the loss of only 1 Swordsmen model.

Empire Campaign Chapter 1 Mission 2 result

Warhammer: Mark of Chaos - Empire Campaign - Chapter 1, Mission 1

Here are general tips for playing the Empire Champaign in Warhammer: Mark of Chaos, on HARD Difficulty. A list of all our Warhammer: Mark of Chaos articles can be found here.
We won't be hand-holding you through absolutely everything, but instead just give tips on situations that we found tricky or that you might not have considered.

Chapter 1: The Call of War

Mission 1: Tower of Darkness

Overview
  • Straightfoward mission, but trickier if you want to get through with no losses whatsoever. Unlike the Chaos Campaign, you do not have easy access to unit resurrection. Remember that our walkthroughs use Hard difficulty and unless stated we DO NOT rely on potions or other one-use items.
  • After this mission, do not go crazy spending the little money you have.
    • E.g., Since handgunners are going to win your fights for you, give them the best weapons. And since you are putting units in front of them to draw fire, for now do not armour them.
    • As you continue forward with Chapter 1, keep in mind that you may need about 15,000 gold to outfit the elves after Chapter 2, Mission 2.
  • You will get a Bright Wizard after this mission. I recommend aiming for Fireball and Spell Focus to pump out a lot of effective fireballs. There is no friendly fire associated with it, so it is a very good spell.
    • If you insist on tanking with Swordsmen or some other melee unit, then you could build up the Flaming Shield of Andor and continue with the enhancements that make the protected unit dangerous to approach. However, since we prefer to aim for zero unit losses, we arranged our units with the Captain up front and the Wizard slightly behind for early fire support and emergency support.
  • If Von Kessel is going to take point (and he can get a high armour rating quickly that he can do so comfortably), move the magic ring from the Bright Wizard to him.
Walkthrough

Fight 1: Marauders
  • Sit tight and let them approach. Volley them with handgunners before turning on armour buffs and engaging with front line of swordsmen.
  • It's okay to use the swordsmen armour buff because we are relying on the two regiments of handgunners to do most of our killing anyway.
Fight 2: Marauders and Axe Throwers
  • Unfortunately, these regiments are close enough that they will move together so we can't pull them to engage them one at a time.
  • There's no time limit, so wait for your handgunners to finish the cooldown on their Volley ability. You can use one or both here, but you'll probably want to save at least one for later.
  • It's a bit tricky, but send Von Kessel ahead ALONE, at the Axe Throwers. Once he gets their attention, turn on Armour of Contempt for an additional +2 to Armour rating.
  • Now that Von Kessel is ahead, the Marauders will probably swing around to attack him because he is closer. Turn Von Kessel around to attack them. Use Storm of Steel to help.
    • When you turn Von Kessel around, the Axe Throwers will be able to shoot again. This is fine for now since we just don't want them to freely throw at our regiments, who have 1 HP a piece and we could lose a few models to the barrage.
  • While Von Kessel is moving up, send the three regiments to back him up as long as it looks like the Marauders are committed to attacking the Captain.
    • The swordsmen should hit the Marauders from behind and hopefully between them and the handgunners, finish them off before Von Kessel is dead.
    • Turn on the swordsmen armour buff because the Marauders will probably turn their attention to the swordsmen.
    • You can try the line formation on the handgunners since that seems to arrange them more quickly (so they can fire sooner) than the default row formation.
  • Finally, mop up the Axe Throwers. As soon as any melee unit (whole regiment or just one model, like a lone hero) engages a shooting regiment, the entire regiment stops shooting. Note that just being in melee distance does not count as engaging -- a regiment must be attacking with hand-to-hand combat in order to stop a regiment from shooting.
Fight 3: Rescue the Bright Wizard
  • Once Fight #2 is finished, assemble and head down immediately to reinforce the Bright Lord.
    • The Bright Lord can last a while, but you still want to hurry because we need to take advantage of that. The sooner we can take pressure off him, the more HP he will have to tank for our regiments.
    • Don't put any regiment in the tower as it is too far to be useful later.
  • March up your regiment fairly close to the Bright Wizard but do not engage with the swordsmen. Let the handgunners volley and kill most of them before sending in Von Kessel and the Swordsmen.
    • It's nice to use the volleys here instead of in Fight 2 because the sooner you can clear the Marauders, the sooner you can charge the Axe Throwers. If the Axe Throwers advance while you are still entangled with the Marauders, getting Von Kessel to intercept them might cause him to take a couple of hits while pushing through the Marauders.
  • Once the Axe Throwers start moving, you need to intercept them before they get too many throws. Have Von Kessel take point and turn on Armour of Contempt. He is probably injured from the previous fight so you need to support him.
    • Once the Marauders near the Bright Lord are gone, just direct everyone to attack the Axe Throwers. When the Swordsmen get close, turn on their armour buff as well and just attack.
With a bit of luck, you should be able to get through this mission with 0 losses. At this early stage it's not a big deal to lose a few models, but we will always try to finish missions with no net losses.